Do You Take Film off of Resin 3d Printer Bed
Yes, you do need to take the film off your resin 3D printer bed occasionally to maintain optimal performance. The film, usually made of FEP, helps with adhesion and protects the bed, but it wears out over time—showing scratches, cloudiness, or peeling.
Removing it gently with non-metal tools and cleaning the bed before applying a new film guarantees consistent print quality. Proper maintenance helps avoid print failures and resin waste.
If you want to keep your prints flawless, there’s more to understand about handling and replacement.
Key Takeaways
- Yes, the resin printer bed film is removed for cleaning, maintenance, or replacement when it shows wear or print quality issues.
- Gently peel the film from a corner using a plastic scraper or fingernail, avoiding metal tools to prevent bed damage.
- Use isopropyl alcohol to loosen adhesive if the film is difficult to remove and clean the bed thoroughly afterward.
- Replace the film if it’s scratched, cloudy, peeling, or causing print adhesion problems to ensure consistent print quality.
- Regular inspection and timely removal of the film prevent print failures, resin waste, and maintain precise curing performance.
Understanding the Purpose of the Film on Resin Printer Beds
Although it might seem like just a simple layer, the film on your resin 3D printer bed plays an essential role in ensuring your prints adhere properly and peel away smoothly. You’ll find this film, often made from materials like FEP (fluorinated ethylene propylene), acts as a non-stick barrier between the resin and the metal bed. This means it protects the bed from resin damage and makes cleanup easier.
The film’s transparency also lets UV light pass through, curing the resin exactly where it needs to. Without this film, you’d risk your prints sticking too firmly to the bed or damaging the surface during removal. So, understanding its purpose helps you appreciate why maintaining or replacing this film is indispensable for consistent print performance.
How the Film Affects Print Adhesion and Quality
You’ll notice the film on your resin printer bed plays a big role in how well your prints stick and how smooth their surfaces turn out. If the film wears down or gets removed, it can change the adhesion quality and affect the final print finish.
Understanding this will help you decide when and how to replace or remove the film without compromising your print results.
Film’s Role in Adhesion
Because the film on your resin 3D printer bed directly contacts each print, it plays a crucial role in how well your models stick during printing. The film’s texture and condition influence adhesion strength—too smooth, and prints might slip; too rough, and removing prints becomes a struggle. A well-maintained film ensures consistent bonding without causing damage when you separate the model.
Over time, scratches or resin buildup can weaken adhesion, leading to failed prints or warping. By keeping the film clean and replacing it when worn, you maintain ideal contact between the print and bed. This balance helps your prints stay secure during curing, reducing the risk of shifting or detaching mid-print, ultimately improving your success rate and print quality.
Impact on Print Surface
The condition of the film on your resin printer bed doesn’t just affect how well prints stick—it also shapes the surface quality of your final model. If the film is scratched, dirty, or uneven, you’ll likely notice imperfections on your print’s bottom layer. These flaws can transfer directly, resulting in rough or inconsistent textures.
A clean, smooth film ensures your model’s base is crisp and detailed, which is vital for parts that require fine features. On the other hand, a damaged film might cause uneven curing, leading to warping or weak adhesion spots. So, keeping the film in good shape not only supports adhesion but also helps maintain the high quality and precision you expect from your resin prints.
Removing Film Effects
Although the film on your resin printer bed plays a crucial role in print adhesion, its condition can also create challenges when removing prints. If the film becomes scratched, cloudy, or damaged, it can cause prints to stick too tightly or unevenly, making removal difficult and risking damage to both the print and the bed. A worn film may also negatively impact print quality, leading to surface imperfections.
You need to regularly inspect the film and replace it if you notice any degradation. Keeping the film clean and intact ensures consistent adhesion and smooth removal. By understanding how the film affects both adhesion and print quality, you can better maintain your printer bed and achieve reliable, high-quality prints every time.
Signs That Indicate You Should Remove the Film
You should consider removing the film if you notice visible damage or wear on its surface. If your prints start having adhesion problems, that’s another clear sign the film isn’t performing well.
Also, surface contamination can compromise print quality, signaling it’s time for a replacement.
Visible Damage or Wear
If you notice any scratches, cloudiness, or peeling on the film, it’s a clear sign that you should remove and replace it. These imperfections can interfere with your prints by disrupting the smooth surface needed for accurate resin curing. Over time, the film’s clarity diminishes, which may cause uneven light distribution and compromise print quality.
Peeling edges not only risk getting caught during printing but can also trap resin underneath, leading to contamination and damage. Regularly inspect the film for any visible wear, especially after multiple print cycles or cleaning sessions. By promptly replacing damaged film, you ensure consistent adhesion and prevent potential print failures.
Keeping the film in good condition is essential for maintaining the reliability and precision of your resin 3D printer.
Adhesion Problems Arise
When adhesion problems arise during printing, it’s a clear sign that the film needs your attention. Poor adhesion can lead to failed prints and wasted resin. You should consider removing the film if you notice:
- Prints consistently detach from the build plate during or after printing.
- The first few layers fail to stick properly, causing warping or incomplete forms.
- There’s visible peeling or bubbling under the film, disrupting the print surface.
- Repeated reprints show uneven adhesion despite correct settings and resin.
Addressing these signs early prevents further issues and maintains print quality. Removing and replacing the film can restore proper adhesion, ensuring your resin prints come out smooth and accurate every time.
Surface Contamination Detected
How can you tell if surface contamination is affecting your resin prints? If you notice spots, streaks, or an oily residue on the film, it’s a clear sign contamination is present. These impurities can prevent proper adhesion, causing prints to fail or peel off mid-process.
You might also see unusual surface textures or inconsistent curing on your prints. If cleaning the film with isopropyl alcohol doesn’t resolve these issues, it’s time to remove and replace the film. Continuing to print on a contaminated surface risks damaging your prints and wasting resin.
Regularly inspecting the film and addressing contamination promptly ensures better print quality and prolongs your printer’s lifespan. Don’t ignore these signs—clean or replace the film to maintain ideal printing conditions.
Step-by-Step Guide to Safely Removing the Film
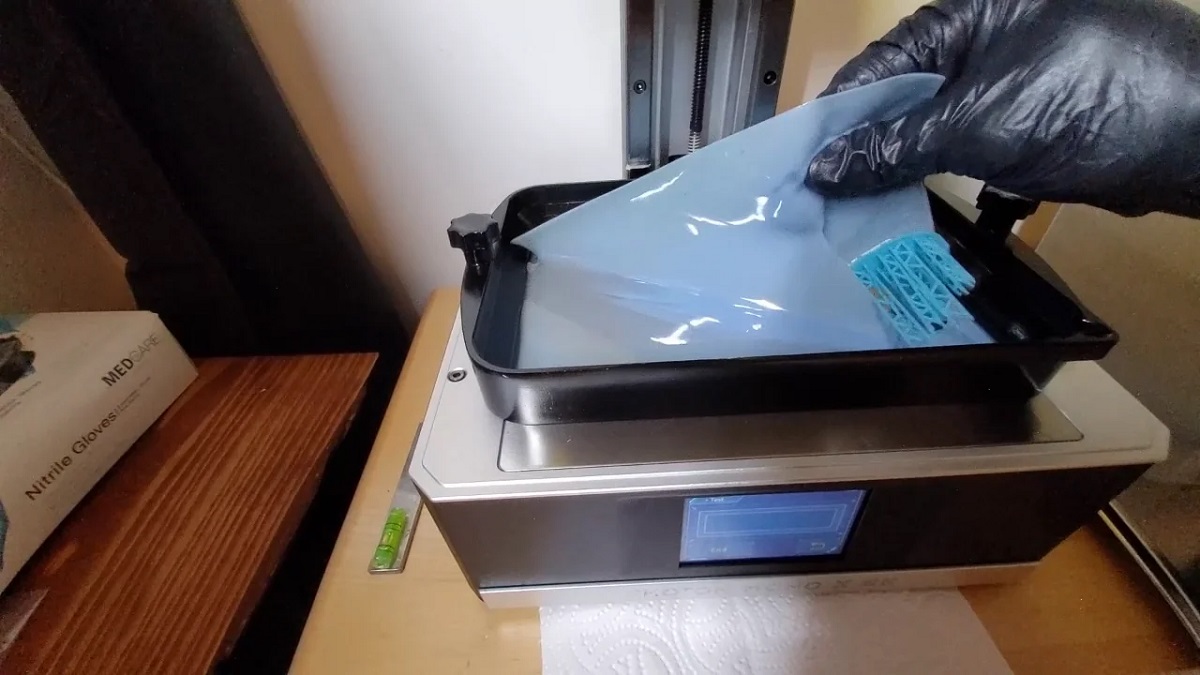
Before you start peeling the film off your resin 3D printer bed, make sure you’ve properly prepared your workspace and taken safety precautions. Wear nitrile gloves to protect your skin from resin residue, and work in a well-ventilated area to avoid inhaling fumes.
Here’s a safe way to remove the film:
- Gently lift a corner of the film using a plastic scraper or your fingernail—avoid metal tools that can scratch the bed.
- Slowly peel the film back at a low angle to prevent tearing or damaging the bed surface.
- If the film resists, apply a small amount of isopropyl alcohol along the edges to loosen adhesive bonds.
- Once removed, clean the bed thoroughly with isopropyl alcohol before applying a new film or printing again.
This method *guarantees* safe, damage-free removal every time.
When to Replace the Film on Your Resin Printer Bed
Although the film on your resin printer bed might look fine at a glance, you’ll want to substitute it as soon as you notice any signs of wear, such as scratches, cloudiness, or peeling, since these can affect print quality and adhesion.
If prints start failing more often or you see uneven curing, these are clear indicators the film’s effectiveness has diminished.
Additionally, if the film has become warped or is difficult to clean, it’s time for a replacement.
Waiting too long can lead to more failed prints and wasted resin.
Regularly inspecting the film after several print cycles helps you catch problems early.
Don’t hesitate to swap it out; a fresh film ensures your prints stick properly and maintain high detail.
Tips for Maintaining the Film to Extend Its Lifespan
Since the film on your resin printer bed plays an essential role in print quality, taking a few simple steps can help you extend its lifespan and save money.
Here’s how you can maintain the film effectively:
- Clean Gently: After each print, carefully remove any resin residue using isopropyl alcohol and a soft cloth to avoid scratches.
- Avoid Sharp Tools: Don’t use metal scrapers or sharp objects; they can damage the film’s surface.
- Store Properly: Keep your printer in a dust-free environment to prevent particles from embedding in the film.
- Check Regularly: Inspect the film for small tears or cloudiness and address issues early to prevent bigger problems.
Following these tips helps keep the film in good condition, ensuring consistent print results and longer use.
Common Mistakes to Avoid When Handling the Film
When handling the film on your resin printer bed, it’s easy to make mistakes that can shorten its lifespan or ruin your prints. One common error is using sharp tools or excessive force when removing the film, which can cause tears or scratches. Avoid peeling the film off too quickly; slow, steady removal helps prevent damage.
Another mistake is neglecting to clean the bed and film properly before and after use, leading to resin buildup that compromises adhesion and print quality. Also, don’t reuse the film indefinitely—over time, it loses flexibility and clarity, affecting prints. Finally, avoid exposing the film to direct sunlight or harsh chemicals, as these can degrade its surface prematurely.
Handle the film gently and with care to maintain ideal printing results.
Alternatives to Using Film on Resin Printer Beds
If you’re looking to simplify maintenance or improve durability, there are several alternatives to using film on your resin printer bed. These options can save you time and reduce hassle during prints:
- Glass Plates – Easy to clean and resistant to scratches, glass offers a smooth surface but may need adhesion aids.
- PEI Sheets – Durable and reusable, PEI provides excellent adhesion without extra treatments.
- BuildTak Sheets – Designed for 3D printing, these sheets improve print adhesion and can be replaced when worn.
- Anodized Aluminum Plates – Robust and heat-resistant, aluminum plates offer a long-lasting print surface but require careful leveling.
Frequently Asked Questions
Can Using Film on the Bed Affect Print Curing Times?
Yes, using film on the bed can affect print curing times because it alters light transmission. You might notice longer or uneven curing, so it’s important to adjust settings accordingly for ideal print quality and efficiency.
Adjusting the curing parameters helps compensate for these changes. Proper calibration ensures consistent results despite the presence of the film.
Is the Film Reusable After Multiple Prints?
Yes, you can reuse the film after multiple prints, but its lifespan depends on how well you maintain it.
Be sure to clean it gently and inspect for damage, so your prints stay consistent and high-quality.
How Does Film Removal Impact Printer Warranty?
Don’t rip the film like it’s your Monday morning alarm—warranty might frown.
Manufacturers often see film removal as normal, but aggressive peeling could void it.
Are There Specific Cleaning Agents Safe for the Film?
You should use isopropyl alcohol or mild soap with water to clean the film safely. Avoid harsh solvents or abrasive cleaners, as they can damage the film and reduce its effectiveness on your resin 3D printer bed.
Using gentle cleaning agents helps maintain the film’s integrity and prolongs its lifespan. Always apply the cleaner with a soft cloth to prevent scratches.
Rinsing the film with clean water after cleaning can remove any residue. Dry the film thoroughly before using it again to ensure optimal performance.
Can Film Cause Damage to Certain Resin Types?
Yes, film can sometimes cause damage to certain resin types by reacting chemically or trapping residue. You’ll want to check your resin’s compatibility with the film to avoid print defects or surface issues during curing and removal.
Conclusion
Think of the film on your resin printer bed like a trusty shield—protecting your prints and ensuring smooth battles with adhesion. Sometimes, this shield wears down and needs replacing or careful removal to keep your prints victorious. By paying attention to its signs and handling it with care, you’ll keep your printing journey running like a well-oiled machine.
So, don’t shy away from tending to this small but mighty guardian of your creations. When you notice issues like poor adhesion or damaged film, it’s time to take the film off your resin 3D printer bed. Proper maintenance, including film removal and replacement, helps ensure consistent print quality and prolongs the life of your printer.