How to Replace Ink in Canon Printer
To replace ink in your Canon printer, first check for faded or streaky prints signaling low ink. Gathering the correct cartridges and having paper towels handy is essential for a smooth replacement process.
Power on the printer and open the ink access panel, where the cartridge holder will move into place.
Carefully remove the old cartridge, then insert the new one until it clicks. Close the panel, run a test print to confirm, and you’re set.
Keep going to learn tips for maintaining your printer and troubleshooting common issues.
Key Takeaways
- Turn on the Canon printer and open the ink cartridge access panel to allow the cartridge holder to move into position.
- Press the cartridge latch to release and carefully remove the old ink cartridge from the slot.
- Unpack the new cartridge, remove protective tape, and firmly insert it until it clicks into place.
- Close the access panel and run a test print to ensure the new cartridge is installed correctly and functioning.
- Regularly check ink levels and clean print heads to maintain print quality and prevent clogs or streaks.
Identifying When to Replace Your Ink Cartridge
Although your Canon printer might still print, you should replace the ink cartridge when you notice faded colors, streaks, or warning messages on the display. These signs indicate the ink is running low or the cartridge is clogged, which can affect print quality. If your documents start looking blurry or colors appear washed out, it’s a clear hint that the cartridge needs changing.
Additionally, if the printer alerts you with an error or low ink notification, don’t dismiss it. Waiting too long might damage the print head or waste ink. Regularly checking the ink levels through your printer’s software can help you stay ahead and ensure consistent, high-quality prints every time you use your Canon printer.
Gathering Necessary Supplies

Before you replace the ink in your Canon printer, you’ll need a few essential supplies to make the process smooth and efficient. First, make sure you have the correct replacement ink cartridges designed specifically for your Canon printer model. Using incompatible cartridges can cause errors or damage.
You’ll also want a clean, lint-free cloth or paper towels handy to wipe any accidental spills or smudges. It’s a good idea to have disposable gloves if you want to keep your hands clean during the replacement. Finally, keep the printer’s user manual nearby or have access to an online version for model-specific instructions.
Having these supplies ready will help you replace the ink quickly without any hassle or mess.
Preparing Your Printer for Ink Replacement
Once you have all your supplies ready, the next step is to prepare your Canon printer for ink replacement. First, make sure your printer is turned on; this allows the cartridge holder to move freely when you open the access area later. Avoid pressing any buttons at this stage to prevent disrupting the printer’s initialization process.
Place the printer on a flat, stable surface near a power outlet and ensure there’s enough light to work comfortably. Have some paper towels or a cloth handy to catch any accidental ink spills. Finally, disconnect any USB cables or wireless connections if you prefer working offline, though this isn’t strictly necessary.
Taking these steps guarantees a smooth ink replacement without damaging your printer or causing messes.
Opening the Ink Cartridge Access Area
Before you start, make sure your Canon printer is powered on. Locate the ink cartridge access panel on your printer.
Then, gently open the cover to reveal the cartridges inside.
Locate Access Panel
Wondering how to access the ink cartridge in your Canon printer? The first step is locating the access panel. This panel is usually found on the front or top of the printer, depending on your model.
Look for a hinged cover or a door that can be gently lifted or slid open. It might have a small handle or indentation to help you open it easily. Avoid forcing it, as the panel should open smoothly to reveal the ink cartridge compartment inside.
Once you locate and open this panel, you’ll see the cartridges lined up, ready for replacement. Knowing exactly where this access point is saves time and prevents accidental damage, making the ink replacement process straightforward and hassle-free.
Power On Printer
After you’ve located and opened the access panel, you’ll need to power on your Canon printer to activate the ink cartridge area. This step guarantees the cartridges move into position for easy replacement. Here’s what you should do:
- Press the power button on the printer.
- Wait for the printer to initialize and stop any noise.
- Look for the ink cartridge holder to move to the center.
- Confirm the display panel shows the printer is ready.
- Avoid touching any internal parts during this process.
Powering on properly is vital; it prevents damage and allows you to safely access the cartridges. Once the printer is on and the cartridge holder is accessible, you’re ready to proceed with replacing the ink.
Gently Open Cover
A gentle touch is key when opening the cover to access the ink cartridges on your Canon printer. First, make sure the printer is powered on; the cartridge carriage needs to be in the correct position. Locate the ink cartridge access cover—usually on the front or top of the printer.
Slowly lift or pull the cover open, avoiding any sudden movements that might damage the mechanisms inside. If you feel resistance, double-check that the printer is on, as the carriage may be locked when off. Once opened, the cartridges will be exposed and ready for replacement.
Keep the cover open while swapping cartridges, then gently close it to avoid misalignment or damage. This careful approach guarantees smooth ink replacement and keeps your printer in good shape.
Removing the Old Ink Cartridge
Now that you’ve opened the ink cartridge access area, it’s time to find the cartridge slot inside the printer. Be careful when handling the old cartridge to avoid any ink spills or damage.
Gently lift and pull the cartridge out to remove it safely.
Locating the Cartridge Slot
Before you can replace the ink, you’ll need to locate the cartridge slot inside your Canon printer. This slot is where the ink cartridges sit and where you’ll be working to swap them out. Here’s how to find it quickly:
- Open the printer’s top cover or scanner unit gently.
- Look inside for a carriage that holds the cartridges.
- The slot is usually centered and may move when the printer is powered on.
- Check for labels indicating “Color” and “Black” cartridges.
- If unsure, consult your printer’s manual or the Canon support website.
Safely Extracting Cartridge
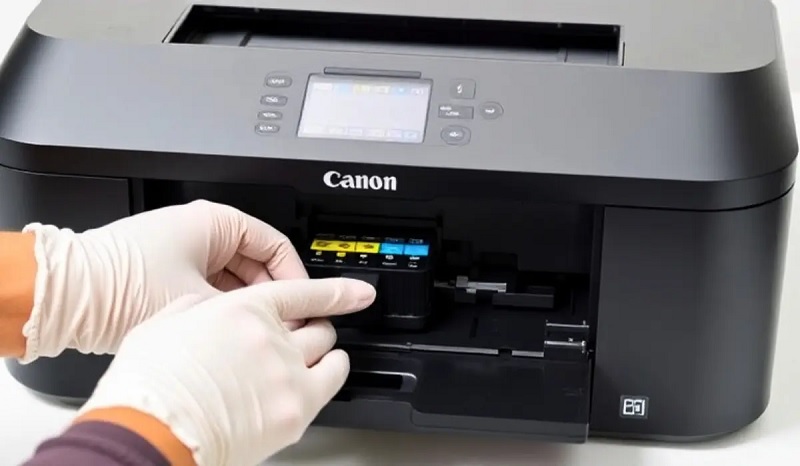
Once you’ve located the cartridge slot, the next step is to carefully remove the old ink cartridge. First, make sure your printer is turned on to release the cartridge holder. Gently press down or lift the cartridge’s release latch, depending on your model.
Avoid using excessive force to prevent damage. Slowly pull the cartridge straight out, holding it by its sides to avoid touching the nozzles or electrical contacts. Place the used cartridge on a protected surface or dispose of it according to local regulations.
If you notice any ink residue, wipe it carefully with a lint-free cloth. Handling the cartridge carefully guarantees smooth replacement and prevents potential printer errors. Now, you’re ready to insert the new cartridge without any hassle.
Installing the New Ink Cartridge
Although removing the old cartridge is important, installing the new ink cartridge correctly guarantees your Canon printer functions smoothly. To do this right, first make sure you’re handling the cartridge carefully to avoid damaging the nozzles or contacts.
Then, follow these steps:
- Remove any protective tape or covers from the new cartridge.
- Align the cartridge with the corresponding slot inside the printer.
- Gently insert the cartridge until it clicks or locks into place.
- Avoid forcing the cartridge; if it doesn’t fit, double-check the orientation.
- Close the printer cover securely to make certain the cartridge stays in place.
Running a Test Print to Confirm Installation
After you’ve securely installed the new ink cartridge, the next step is to run a test print to make sure everything’s working correctly. This helps confirm proper ink flow and cartridge alignment. To start, access your printer’s menu and select the “Print Test Page” option.
Check the printed page for color accuracy and clarity. If you notice streaks or missing colors, you may need to clean the print head or reinstall the cartridge.
| Step | Purpose |
|---|---|
| Access printer menu | Navigate to test print option |
| Select test page | Initiate test print |
| Review print quality | Check for errors or streaks |
| Troubleshoot if needed | Clean print head or reinstall |
Running this test ensures your printer is ready for superior use.
Frequently Asked Questions
Can I Use Third-Party Ink Cartridges in My Canon Printer?
Yes, you can use third-party ink cartridges in your Canon printer, but be aware they might cause print quality issues or void your warranty.
Make sure to select reputable brands to minimize problems and guarantee compatibility.
How Do I Recycle Used Canon Ink Cartridges Properly?
Did you know over 375 million ink cartridges end up in landfills yearly? You can recycle your Canon cartridges by returning them via Canon’s recycling program or local electronic waste centers. They’ll guarantee proper disposal and environmental safety.
What Should I Do if My Printer Doesn’t Recognize the New Cartridge?
If your printer doesn’t recognize the new cartridge, try removing and reinstalling it carefully. Make sure it’s compatible and the protective tape is removed.
Restart your printer, and if issues persist, update the printer’s firmware or contact support.
Are Canon Ink Cartridges Compatible Across Different Printer Models?
About 70% of Canon ink cartridges aren’t compatible across different models. You’ll need to check your specific printer’s requirements because each model often uses unique cartridges designed for its technology and size.
Compatibility varies widely, so using the wrong cartridge can lead to printing problems or damage. Always refer to your printer’s manual or Canon’s official website for guidance. This ensures you get the right cartridge for optimal performance.
How Long Does an Ink Cartridge Typically Last Once Installed?
An ink cartridge usually lasts for a few hundred pages, but it really depends on your printing habits.
If you print frequently or with high coverage, it’ll run out faster. Keep an eye on your printer’s ink level indicator.
Conclusion
Now that you’ve replaced your Canon printer’s ink cartridge, you’re all set to get back to printing without a hitch. Just remember, keeping an eye on your ink levels can save you from last-minute scrambles.
With these simple steps, you’ll handle ink changes like a pro—no need to reinvent the wheel each time.
So go ahead, print away confidently, knowing your printer’s ready to deliver sharp, vibrant results every time! Replacing ink in Canon printer is easy when you follow the right procedure.